SpringBoot ログイン画面作成
SpringBootでログイン画面を作成し、データベースに登録されているユーザーとパスワードが合致した場合にログイン可能にするログイン認証画面の作成方法を解説する
■開発環境
OS:Windows
IDE:Eclipse(ver:2019-06)
ビルドツール:Gradle
DB:MySQL
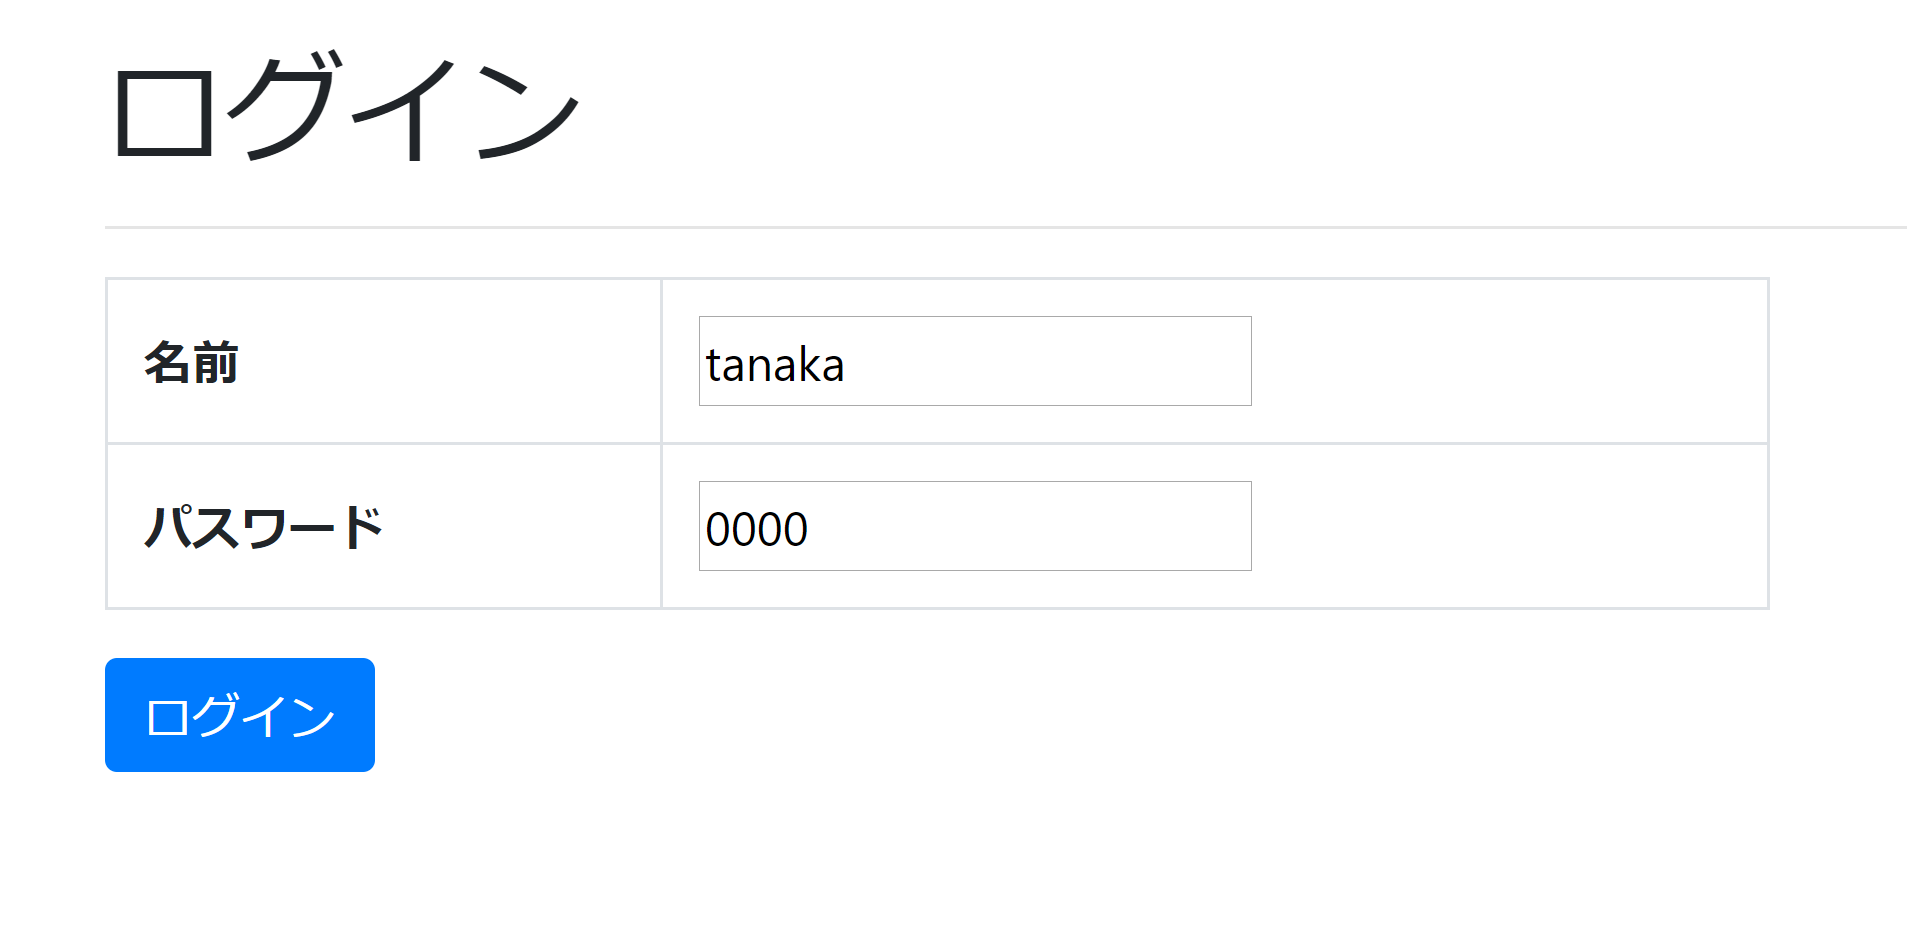
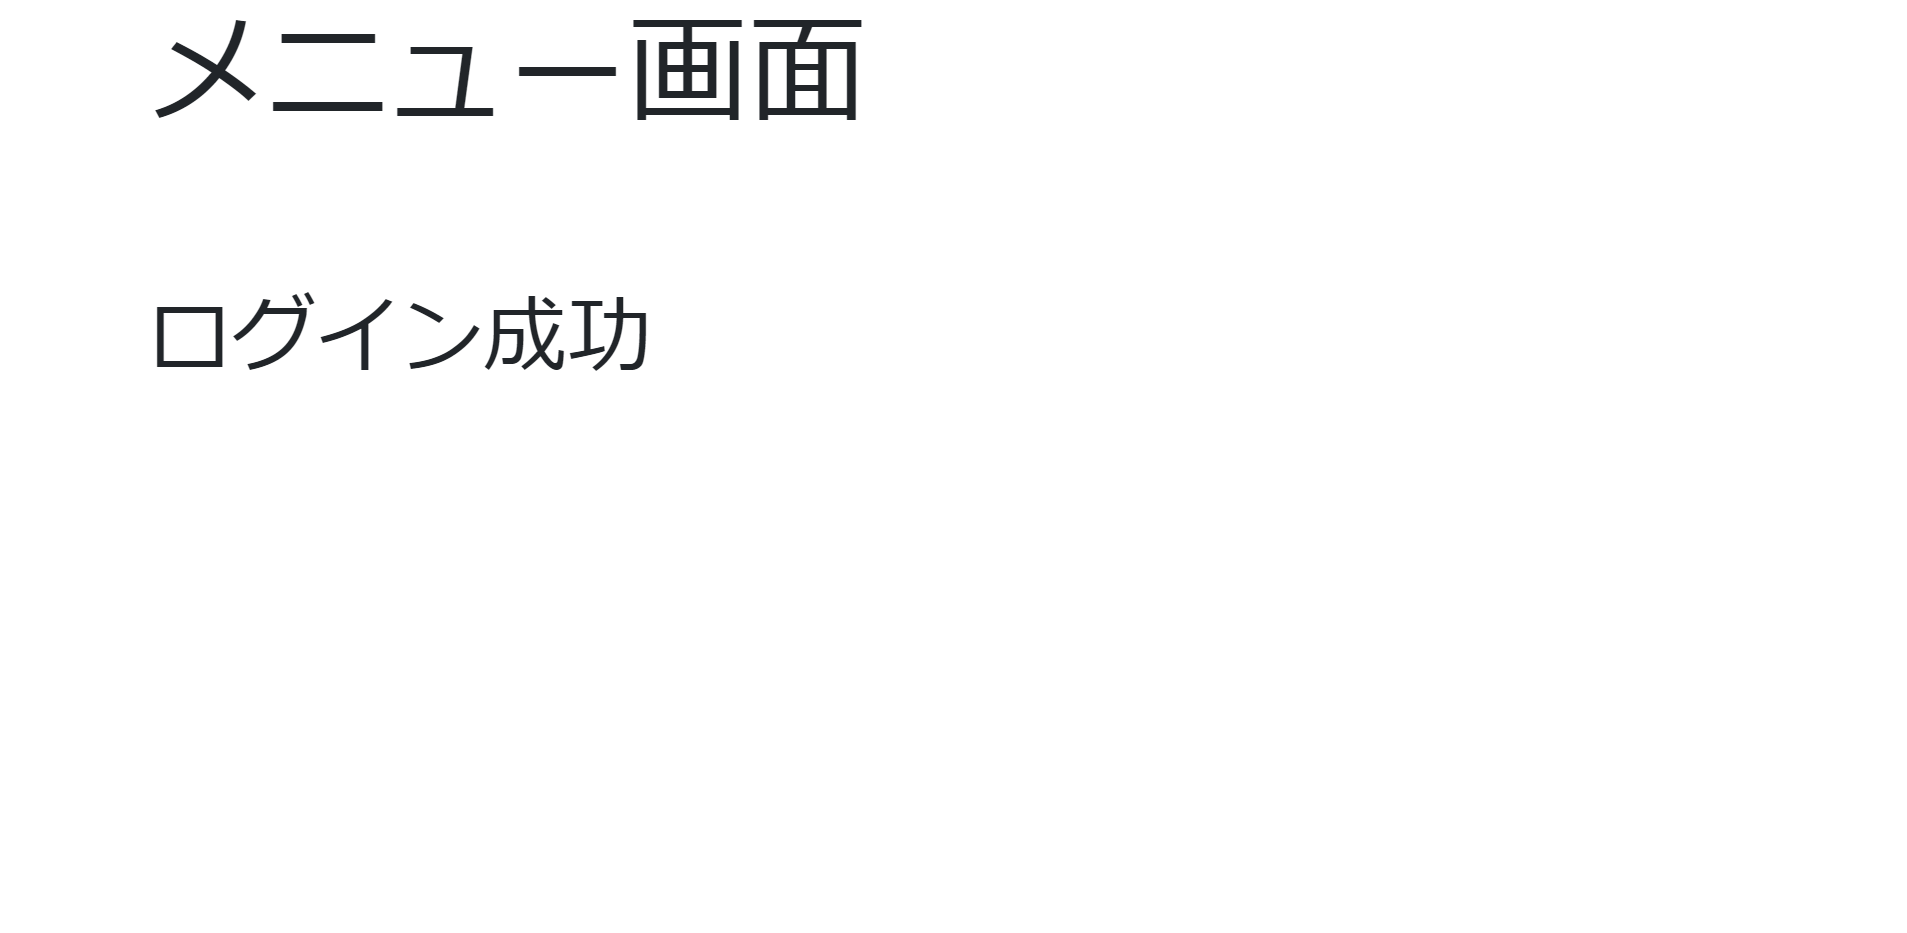
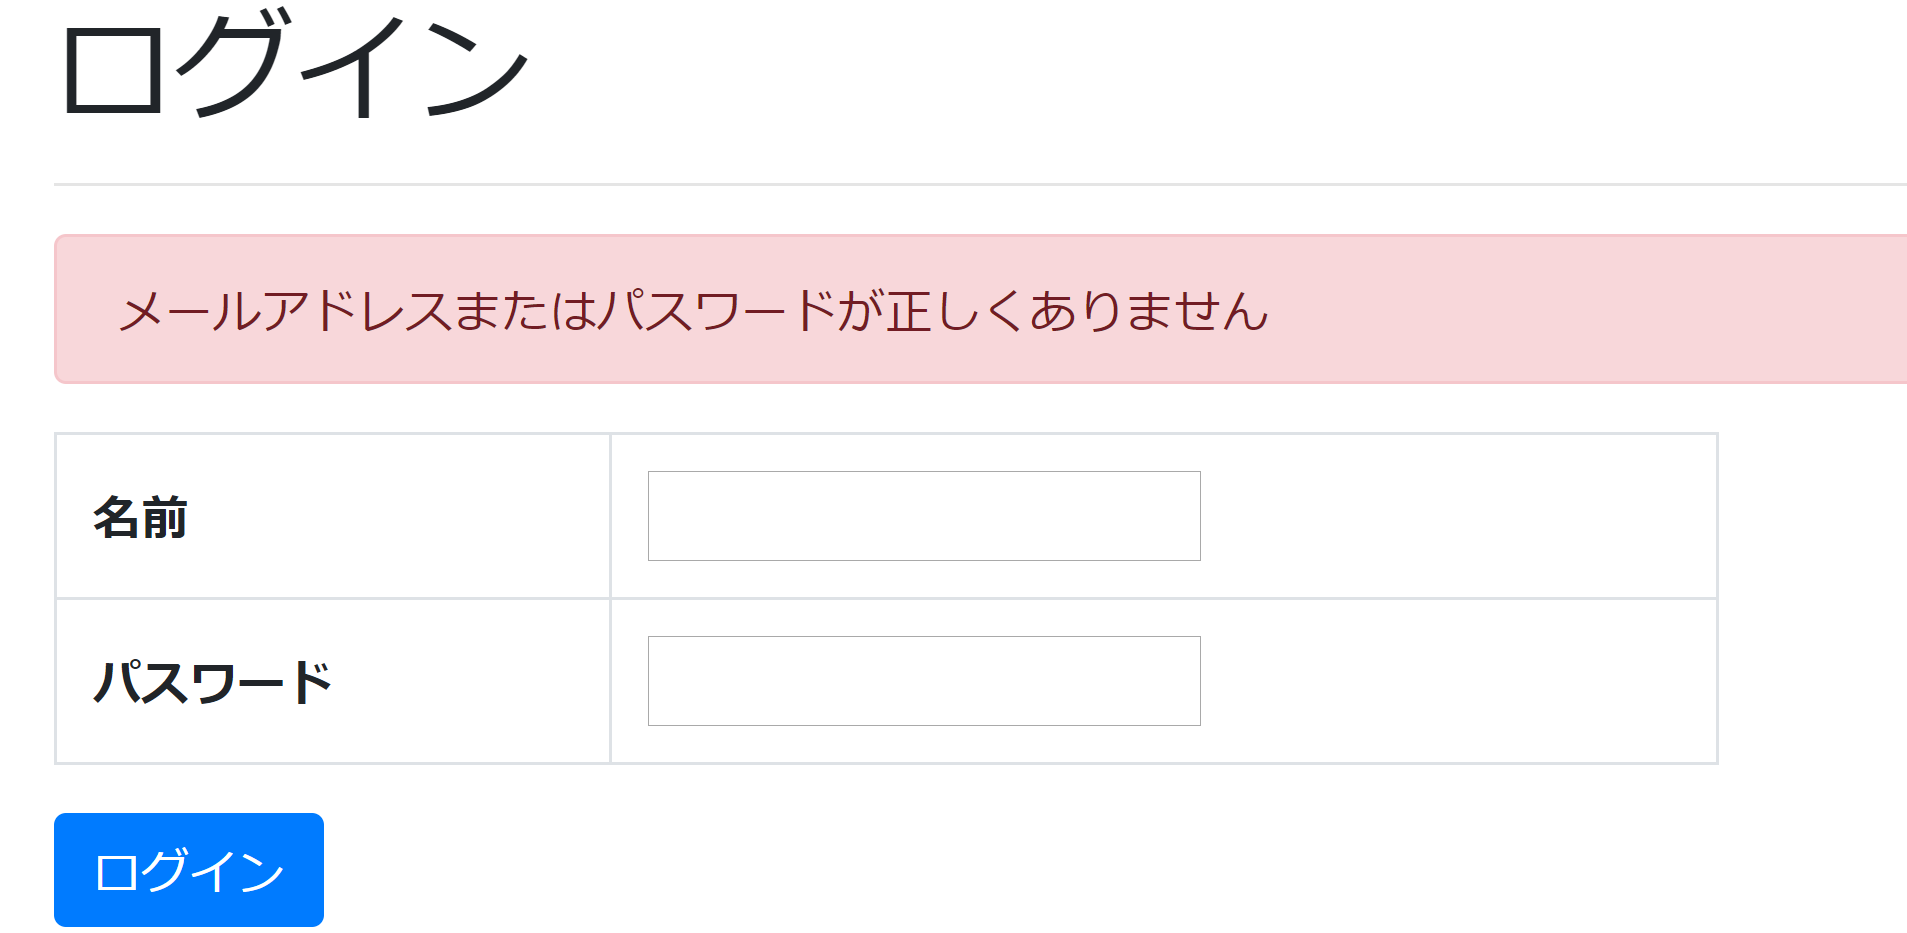
■作成後の画面
・ログイン成功時
・ログイン失敗時
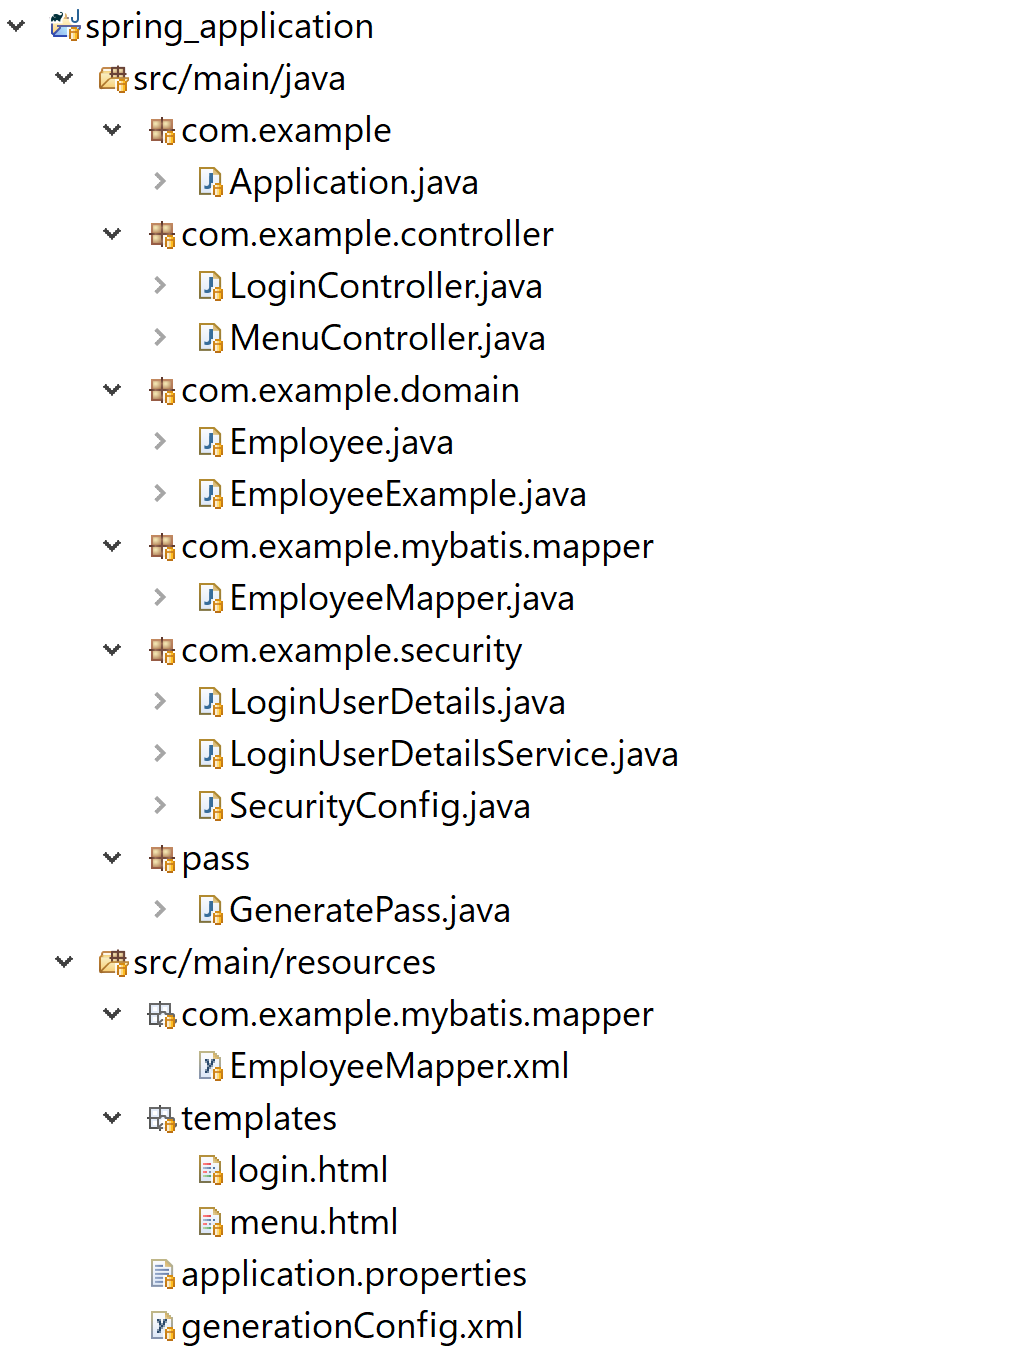
■ディレクトリ構成
最終的なディレクトリ構成
①下記ライブラリを保有するSpringプロジェクトを作成
プロジェクト名:spring_application
依存ライブラリ:
・Spring Security
・Lombok
・Spring Boot DevTools
・Spring Web
・MySQL Driver
・Spring Data JPA
・Thymeleaf
・MyBatis ※③で設定する
②DB設定
・employeeテーブル作成
create table employee (
    id int primary key auto_increment
    , name varchar(10)
    , password varchar(256)
    );
・application.properties
データベース名:spring_application
ユーザー名:dbuser
パスワード:0000
# DB接続情報
spring.datasource.url=jdbc:mysql://localhost:3306/spring_application?serverTimezone=JST
spring.datasource.username=dbuser
spring.datasource.password=0000
spring.datasource.driverClassName=com.mysql.cj.jdbc.Driver
③MyBatisでORマッパー関連の設定
詳細は下記参照
MyBatis Generatorの設定方法と実行
後ほど作成する「LoginUserDetailsService.java」で使用する為に
「EmployeeMapper.java」に下記を追加する
@Select({
    "select * from employee where name = #{name} limit 1"
})
Employee selectByName(String name);
④セキュリティ関連クラス作成
下記3つのセキュリティ関連クラスを作成
■SecurityConfig.java(セキュリティ設定クラス)
■LoginUserDetails.java(ログイン認証ユーザークラス)
■LoginUserDetailsService.java(ログインイン時に認証ユーザーを「employeeテーブル」から情報を取得するクラス)
・SecurityConfig.java
package com.example.security;

import org.springframework.context.annotation.Bean;
import org.springframework.security.config.annotation.web.builders.HttpSecurity;
import org.springframework.security.config.annotation.web.builders.WebSecurity;
import org.springframework.security.config.annotation.web.configuration.EnableWebSecurity;
import org.springframework.security.config.annotation.web.configuration.WebSecurityConfigurerAdapter;
import org.springframework.security.crypto.bcrypt.BCryptPasswordEncoder;
import org.springframework.security.crypto.password.PasswordEncoder;

@EnableWebSecurity
public class SecurityConfig extends WebSecurityConfigurerAdapter {

    @Override
    public void configure(WebSecurity web) throws Exception {
        //静的リソースをセキュリティ対象外に設定
        web.ignoring().antMatchers("/webjars/**", "/css/**");
    }

    @Override
    protected void configure(HttpSecurity http) throws Exception {
        http
            .authorizeRequests()
                //「login.html」はログイン不要でアクセス可能に設定
                .antMatchers("/login").permitAll()
                //上記以外は直リンク禁止
                .anyRequest().authenticated()
            .and()
            .formLogin()
                //ログイン処理のパス
                .loginProcessingUrl("/login")
                //ログインページ
                .loginPage("/login")
                //ログインエラー時の遷移先 ※パラメーターに「error」を付与
                .failureUrl("/login?error")
                //ログイン成功時の遷移先
                .defaultSuccessUrl("/menu", true)
                //ログイン時のキー:名前
                .usernameParameter("name")
                //ログイン時のパスワード
                .passwordParameter("password")
            .and()
            .logout()
                //ログアウト時の遷移先 POSTでアクセス
                .logoutSuccessUrl("/login");
    }

    //パスワードのアルゴリズムをBCryptに設定
    @Bean
    PasswordEncoder passwordEncoder() {
        return new BCryptPasswordEncoder();
    }
}
・LoginUserDetails.java
package com.example.security;

import org.springframework.security.core.authority.AuthorityUtils;
import org.springframework.security.core.userdetails.User;

import com.example.domain.Employee;

import lombok.Data;
import lombok.EqualsAndHashCode;

@Data
//equals()とhashCode()を生成するが親クラスのメソッドは呼び出さない
@EqualsAndHashCode(callSuper=false)
public class LoginUserDetails extends User {
    //employeeテーブルから取得したオブジェクトを格納
    private final Employee employee;

    //認証処理
    public LoginUserDetails(Employee employee, String role) {
        //employeeテーブルの名前とパスワードでログイン認証を行う
        super(employee.getName(), employee.getPassword(), AuthorityUtils.createAuthorityList(role));
        this.employee = employee;
    }
}
・LoginUserDetailsService.java
package com.example.security;

import org.springframework.beans.factory.annotation.Autowired;
import org.springframework.security.core.userdetails.UserDetails;
import org.springframework.security.core.userdetails.UserDetailsService;
import org.springframework.security.core.userdetails.UsernameNotFoundException;
import org.springframework.stereotype.Service;

import com.example.domain.Employee;
import com.example.mybatis.mapper.EmployeeMapper;

/***
 * ログインイン時に認証ユーザーを「employeeテーブル」から情報を取得するクラス
 */
@Service
public class LoginUserDetailsService implements UserDetailsService {
    @Autowired
    EmployeeExample employeeExample;

    @Autowired
    EmployeeMapper employeeMapper;

    @Override
    public UserDetails loadUserByUsername(String name) throws UsernameNotFoundException {
        //入力された名前をキーにemployeeテーブルのレコードを1件取得
        Employee employee = employeeMapper.selectByName(name);

        //該当レコードが取得できなかった場合はエラーにする
        if  (employee   ==  null)   {
            throw new UsernameNotFoundException("Wrong email or password");
        }

        //ログインユーザー権限を設定
        String role = "ROLE_ADMIN";

        return new LoginUserDetails(employee, role);
    }
}
⑤ログインコントローラークラス作成
・LoginController.java
package com.example.controller;

import org.springframework.stereotype.Controller;
import org.springframework.web.bind.annotation.GetMapping;
import org.springframework.web.bind.annotation.PostMapping;
import org.springframework.web.bind.annotation.RequestMapping;

@Controller
@RequestMapping("login")
public class LoginController {
    //ログイン画面への遷移
    @GetMapping
    String getLogin() {
        return "login";
    }

    //ログイン成功時のメニュー画面への遷移
    @PostMapping
    String postLogin() {
        return "redirect:/menu";
    }
}
⑥ログイン画面作成
・login.html
<!DOCTYPE html>
<html xmlns:th="http://www.thymeleaf.org">
<head>
<meta charset="UTF-8">
<link rel="stylesheet" th:href="@{/webjars/bootstrap/4.3.1/css/bootstrap.min.css}">
<title>ログイン</title>
</head>
<body>
    <div class="container">
        <h1 class="my-3">ログイン</h1>
        <hr>
        <!--/* ログインエラー時にメッセージを表示 */-->
        <div th:if="${param.error}" class="alert alert-danger">
            名前またはパスワードが正しくありません
        </div>
        <form th:action="@{/login}" method="post">
            <table class="table table-bordered col-md-6">
            <tr class="form-group">
                <th class="align-middle">名前</th>
                <td><input type="text" class="form-controll" name="name"></td>
            </tr>
            <tr class="form-group">
                <th class="align-middle">パスワード</th>
                <td><input type="text" class="form-controll" name="password"></td>
            </tr>
            </table>
            <div>
                <input type="submit" class="btn btn-primary" value="ログイン">
            </div>
        </form>
    </div>
    <script src="@{/webjars/jquery/3.4.1/jquery.min.js}"></script>
    <script src="@{/webjars/bootstrap/4.3.1/js/bootstrap.min.js}"></script>
</body>
</html>
⑦ログイン成功後の遷移先コントローラークラス作成
・MenuController.java
package com.example.controller;

import org.springframework.stereotype.Controller;
import org.springframework.web.bind.annotation.GetMapping;

@Controller
public class MenuController {
    //メニュー画面への遷移
    @GetMapping("menu")
    String index() {
        return "menu";
    }
}
⑧ログイン成功後の画面作成
・menu.html
<!DOCTYPE html>
<html xmlns:th="http://www.thymeleaf.org">
<head>
<meta charset="UTF-8">
<link rel="stylesheet" th:href="@{/webjars/bootstrap/4.3.1/css/bootstrap.min.css}">
<title>メニュー</title>
</head>
<body>
    <div class="container">
        <h1 class="mb-5">メニュー画面</h1>
        <h3>ログイン成功</h3>
    </div>
    <script src="@{/webjars/jquery/3.4.1/jquery.min.js}"></script>
    <script src="@{/webjars/bootstrap/4.3.1/js/bootstrap.min.js}"></script>
</body>
</html>
⑨パスワード生成
・GeneratePass.java
BCryptアルゴリズムで「0000」に設定した場合
package pass;

import org.springframework.security.crypto.bcrypt.BCryptPasswordEncoder;

public class GeneratePass {

    public static void main(String[] args) {
        System.out.println(new BCryptPasswordEncoder().encode("0000"));
    }
}
⑩ログイン確認
employeeテーブルに任意の「名前」と上記で作成した「パスワード」をインサートしてログイン遷移を確認
※今回は下記をインサート
名前:tanaka
パスワード:0000
尚、ログインユーザーを表示したい場合は「Thymeleaf Extras Springsecurity5」を使用する
Spring Boot Thymeleaf Extras Springsecurity5