SpringBoot × Ajax通信による画面遷移
JavaScriptによる画面遷移とAjaxを使ったPOSTによる画面遷移方法
更にSpring SecurityとAjaxを組み合わせる方法もあわせて解説する
尚、テンプレートエンジンにはThymeleafを使用する
■①JavaScriptによるシンプルな画面遷移
JavaScriptによる画面遷移とjaxを使ったPOSTによる画面遷移
・index.html
<!DOCTYPE html>
<html xmlns:th="http://www.thymeleaf.org">
<head>
<meta charset="UTF-8">
<title>JavaScript</title>
</head>
<body>
    <div>
        <p><button onclick="clickGet()">GETで遷移</button></p>
        <p><button onclick="clickPost()">POSTで遷移(Ajax)</button></p>
    </div>
    <script src="https://ajax.googleapis.com/ajax/libs/jquery/3.4.1/jquery.min.js"></script>
    <script src="/js/main.js"></script>
</body>
</html>
・main.js
//「GETで遷移」ボタン押下時の処理
function clickGet() {
    //MainControllerのgetIndex()メソッドに遷移
    location.href="/";
}

//「POSTで遷移(Ajax)」ボタン押下時の処理
function clickPost() {
    $.ajax({
        //MainControllerのpostIndex()メソッドに遷移
        url: '/',
        type: 'POST',
        timeout: 60000,
        data: null
    })
    //Ajax通信成功の場合
    .done(function() {
        alert('success!');
    })
    //Ajax通信失敗の場合
    .fail(function() {
        alert('fail!');
    })
    //Ajax通信の成功・失敗に関わらず最後に処理
    .always(function() {
        alert('end');
    });
}
・MainController.java
package com.example.controller;

import org.springframework.stereotype.Controller;
import org.springframework.web.bind.annotation.GetMapping;
import org.springframework.web.bind.annotation.PostMapping;

@Controller
public class MainController {
    @GetMapping
    String getIndex() {
        return "index";
    }

    @PostMapping
    String postIndex() {
        return "index";
    }
}
■②Spring SecurityとAjaxを組み合わせによる画面遷移
・build.gradleに下記を追記
implementation 'org.springframework.boot:spring-boot-starter-security'
あとは「①JavaScriptによるシンプルな画面遷移」で作成したソースコードをそのまま使う
尚、「Spring Security」を設定するとアプリケーションを起動した際にログイン画面が表示されるので下記でログインする
・username:user
・password:Spring Bootを起動した時にコンソールに表示されるパスワード
「GETで遷移」ボタン押下時は特にエラーなく、処理が実行される
しかし、「POSTで遷移(Ajax)」ボタン押下時の処理は403エラーとなる
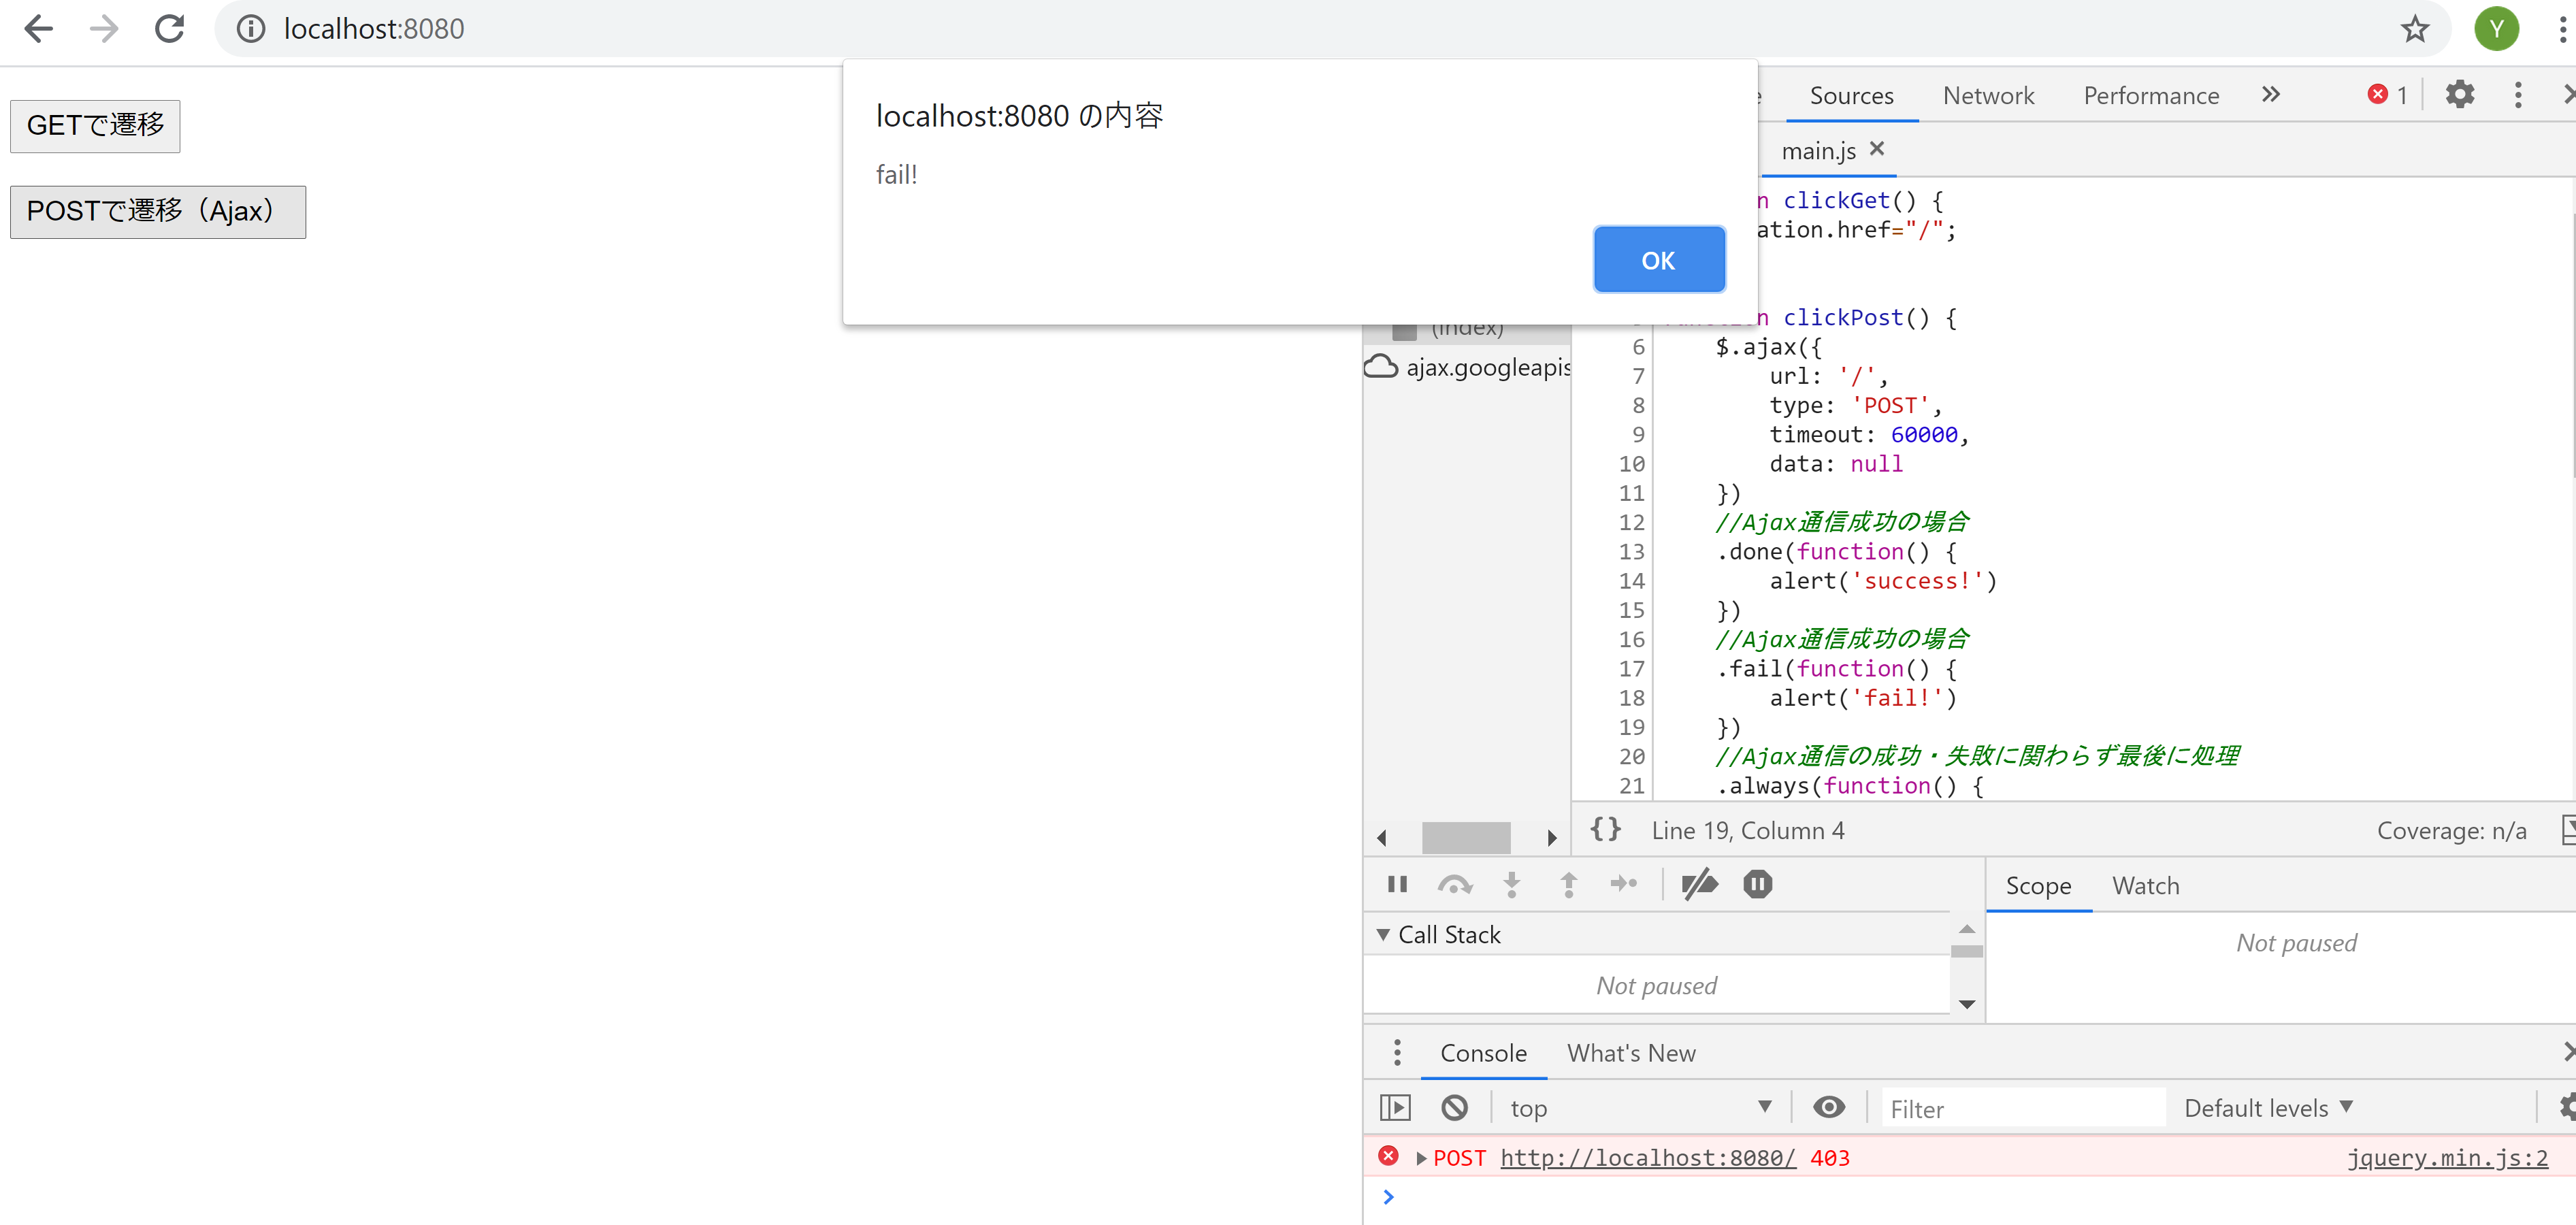
【なぜ403エラーになるのか?】
一言でいうとSpring SecurityにはデフォルトでCSRF対策が有効になっているからです
CSRFは知っているから説明いらないよという場合は読み飛ばしてください
読み飛ばす
【CSRFとは】
Cross-Site Request Forgeries(クロスサイトリクエストフォージェリ)の略
【CSRFの流れ】
①ログインが必要なサイト(ショッピングサイトやSNSなど)にユーザーがログイン
②攻撃者が用意した攻撃用サイト(そっくりなサイトなど)にユーザーを誘導し、ユーザーのセッション情報などを盗む
③攻撃者が①のサイトに偽造したリクエストを送信する
④①のサイトでCSRF対策がされていない場合、攻撃者が偽造したリクエストを正規のリクエストとして処理してしまう
結果、パスワードが変更されて乗っ取られたり、情報が盗まれたりする
【CSRF対策とは】
攻撃者が用意したWebページから送られてくる偽造リクエストを不正なリクエストとして扱う為の対策
※サーバー側の代表的な対策
・秘密情報(トークン)の埋め込み
・パスワードの再入力
・Referer(リンク元URLの情報)のチェック
■解決策
・メタタグにヘッダー名とトークンの値を埋め込む
・HTTPリクエストヘッダーにヘッダー名とトークンの値をセットしてAjax通信を行う
・index.htmlのメタタグに下記を追記
<!-- トークンの値 -->
<meta name="_csrf" th:content="${_csrf.token}"/>
<!-- ヘッダー名 -->
<meta name="_csrf_header" th:content="${_csrf.headerName}"/>
・main.jsに下記を追記
//Ajax通信のコードの前に記述

//JQueryのattr()メソッドでメタタグに埋め込んだ「_csrf」という名前のcontent属性を取得し変数tokenにセット
let token = $("meta[name='_csrf']").attr("content");
//同様に「_csrf_header」という名前のcontent属性を取得し変数haderにセット
let header = $("meta[name='_csrf_header']").attr("content");

//Ajaxリクエストが送信される直前に実行
$(document).ajaxSend(function(e, xhr, options) {
 //HTTPリクエストヘッダーにヘッダー名とトークンの値をセット
  xhr.setRequestHeader(header, token);
});
尚、トークンチェックが行わえるのはPOSTやPUT、DELETE等のHTTPメソッドの場合である
GETでAjax通信する場合は上記のようにトークンをリクエストヘッダーにセットする必要はない
③AjaxにJSONデータを送受信するサンプル
・index.html
<!DOCTYPE html>
<html xmlns:th="http://www.thymeleaf.org">
<head>
<meta charset="UTF-8">
<meta name="_csrf" th:content="${_csrf.token}"/>
<meta name="_csrf_header" th:content="${_csrf.headerName}"/>
<title>JavaScript</title>
</head>
<body>
    <div>
        <select onchange="changeMonth(this.value)">
            <option value="202004">2020年04月</option>
            <option value="202005">2020年05月</option>
            <option value="202006">2020年06月</option>
        </select>
    </div>
    <script src="https://ajax.googleapis.com/ajax/libs/jquery/3.4.1/jquery.min.js"></script>
    <script src="/js/main.js"></script>
</body>
</html>
・main.js
function changeMonth(month) {
    let d = {'month':month};

    let token = $("meta[name='_csrf']").attr("content");
    let header = $("meta[name='_csrf_header']").attr("content");

    $(document).ajaxSend(function(e, xhr, options) {
        xhr.setRequestHeader(header, token);
    });

    $.ajax({
        url: '/',
        type: 'POST',
        dataType: 'json',
        timeout: 60000,
        contentType : "application/json",
        async: false,
        data: JSON.stringify(d)
    })
    //Ajax通信成功の場合
    .done(function(data, textStatus, jqXHR) {
        alert(JSON.stringify(data));
        alert(data.month);
        alert(textStatus);
    })
    //Ajax通信失敗の場合
    .fail(function(jqXHR, textStatus, errorThrown) {
        alert('fail!');
        alert(jqXHR.readyState);
        alert(textStatus);
        alert(errorThrown);

    })
    //Ajax通信の成功・失敗に関わらず最後に処理
    .always(function() {
        alert('end');
    });
}
・MainController.java
package com.example.controller;

import org.springframework.stereotype.Controller;
import org.springframework.web.bind.annotation.GetMapping;
import org.springframework.web.bind.annotation.PostMapping;
import org.springframework.web.bind.annotation.RequestBody;
import org.springframework.web.bind.annotation.ResponseBody;

@Controller
public class MainController {
    @GetMapping
    String getIndex() {
        return "index";
    }

    @ResponseBody
    @PostMapping
    String postIndex(@RequestBody String month) {
        System.out.println(month);
        return month;
    }
}
【jqXHRとは】
JavaScriptの組み込みオブジェクトの「XMLHttpRequest」をjQueryでパワーアップしたようなもの
またXMLだけでなくあらゆる種類のデータを受け取ることが可能