SpringBoot入門 vol.13:Bootstrapでスタイルを整えよう
前回までに作成したアプリケーションに「Bootstarp」を使ってスタイルを整えていく
今回は「WebJars」を利用してBootstrapを使えるようにする
■Webjarsとは
「CSS」や「JavaScript」などのクライアントサイドのライブラリの依存関係をGradleで管理できるサービス
①Build.Gradleの編集
「Webjars」を利用して「Bootstrap」を使う為の設定を追記する
記述ブロック:dependencies
追記コード:
implementation 'org.webjars:bootstrap:4.3.1'
implementation 'org.webjars:jquery:3.4.1'
記述後:
plugins {
    id 'org.springframework.boot' version '2.2.2.RELEASE'
    id 'io.spring.dependency-management' version '1.0.8.RELEASE'
    id 'java'
}

group = 'com.example'
version = '0.0.1-SNAPSHOT'
sourceCompatibility = '11'

configurations {
    developmentOnly
    runtimeClasspath {
        extendsFrom developmentOnly
    }
    compileOnly {
        extendsFrom annotationProcessor
    }
}

repositories {
    mavenCentral()
}

dependencies {
    //追記
    implementation 'org.webjars:bootstrap:4.3.1'
    implementation 'org.webjars:jquery:3.4.1'

            .
            .
            .
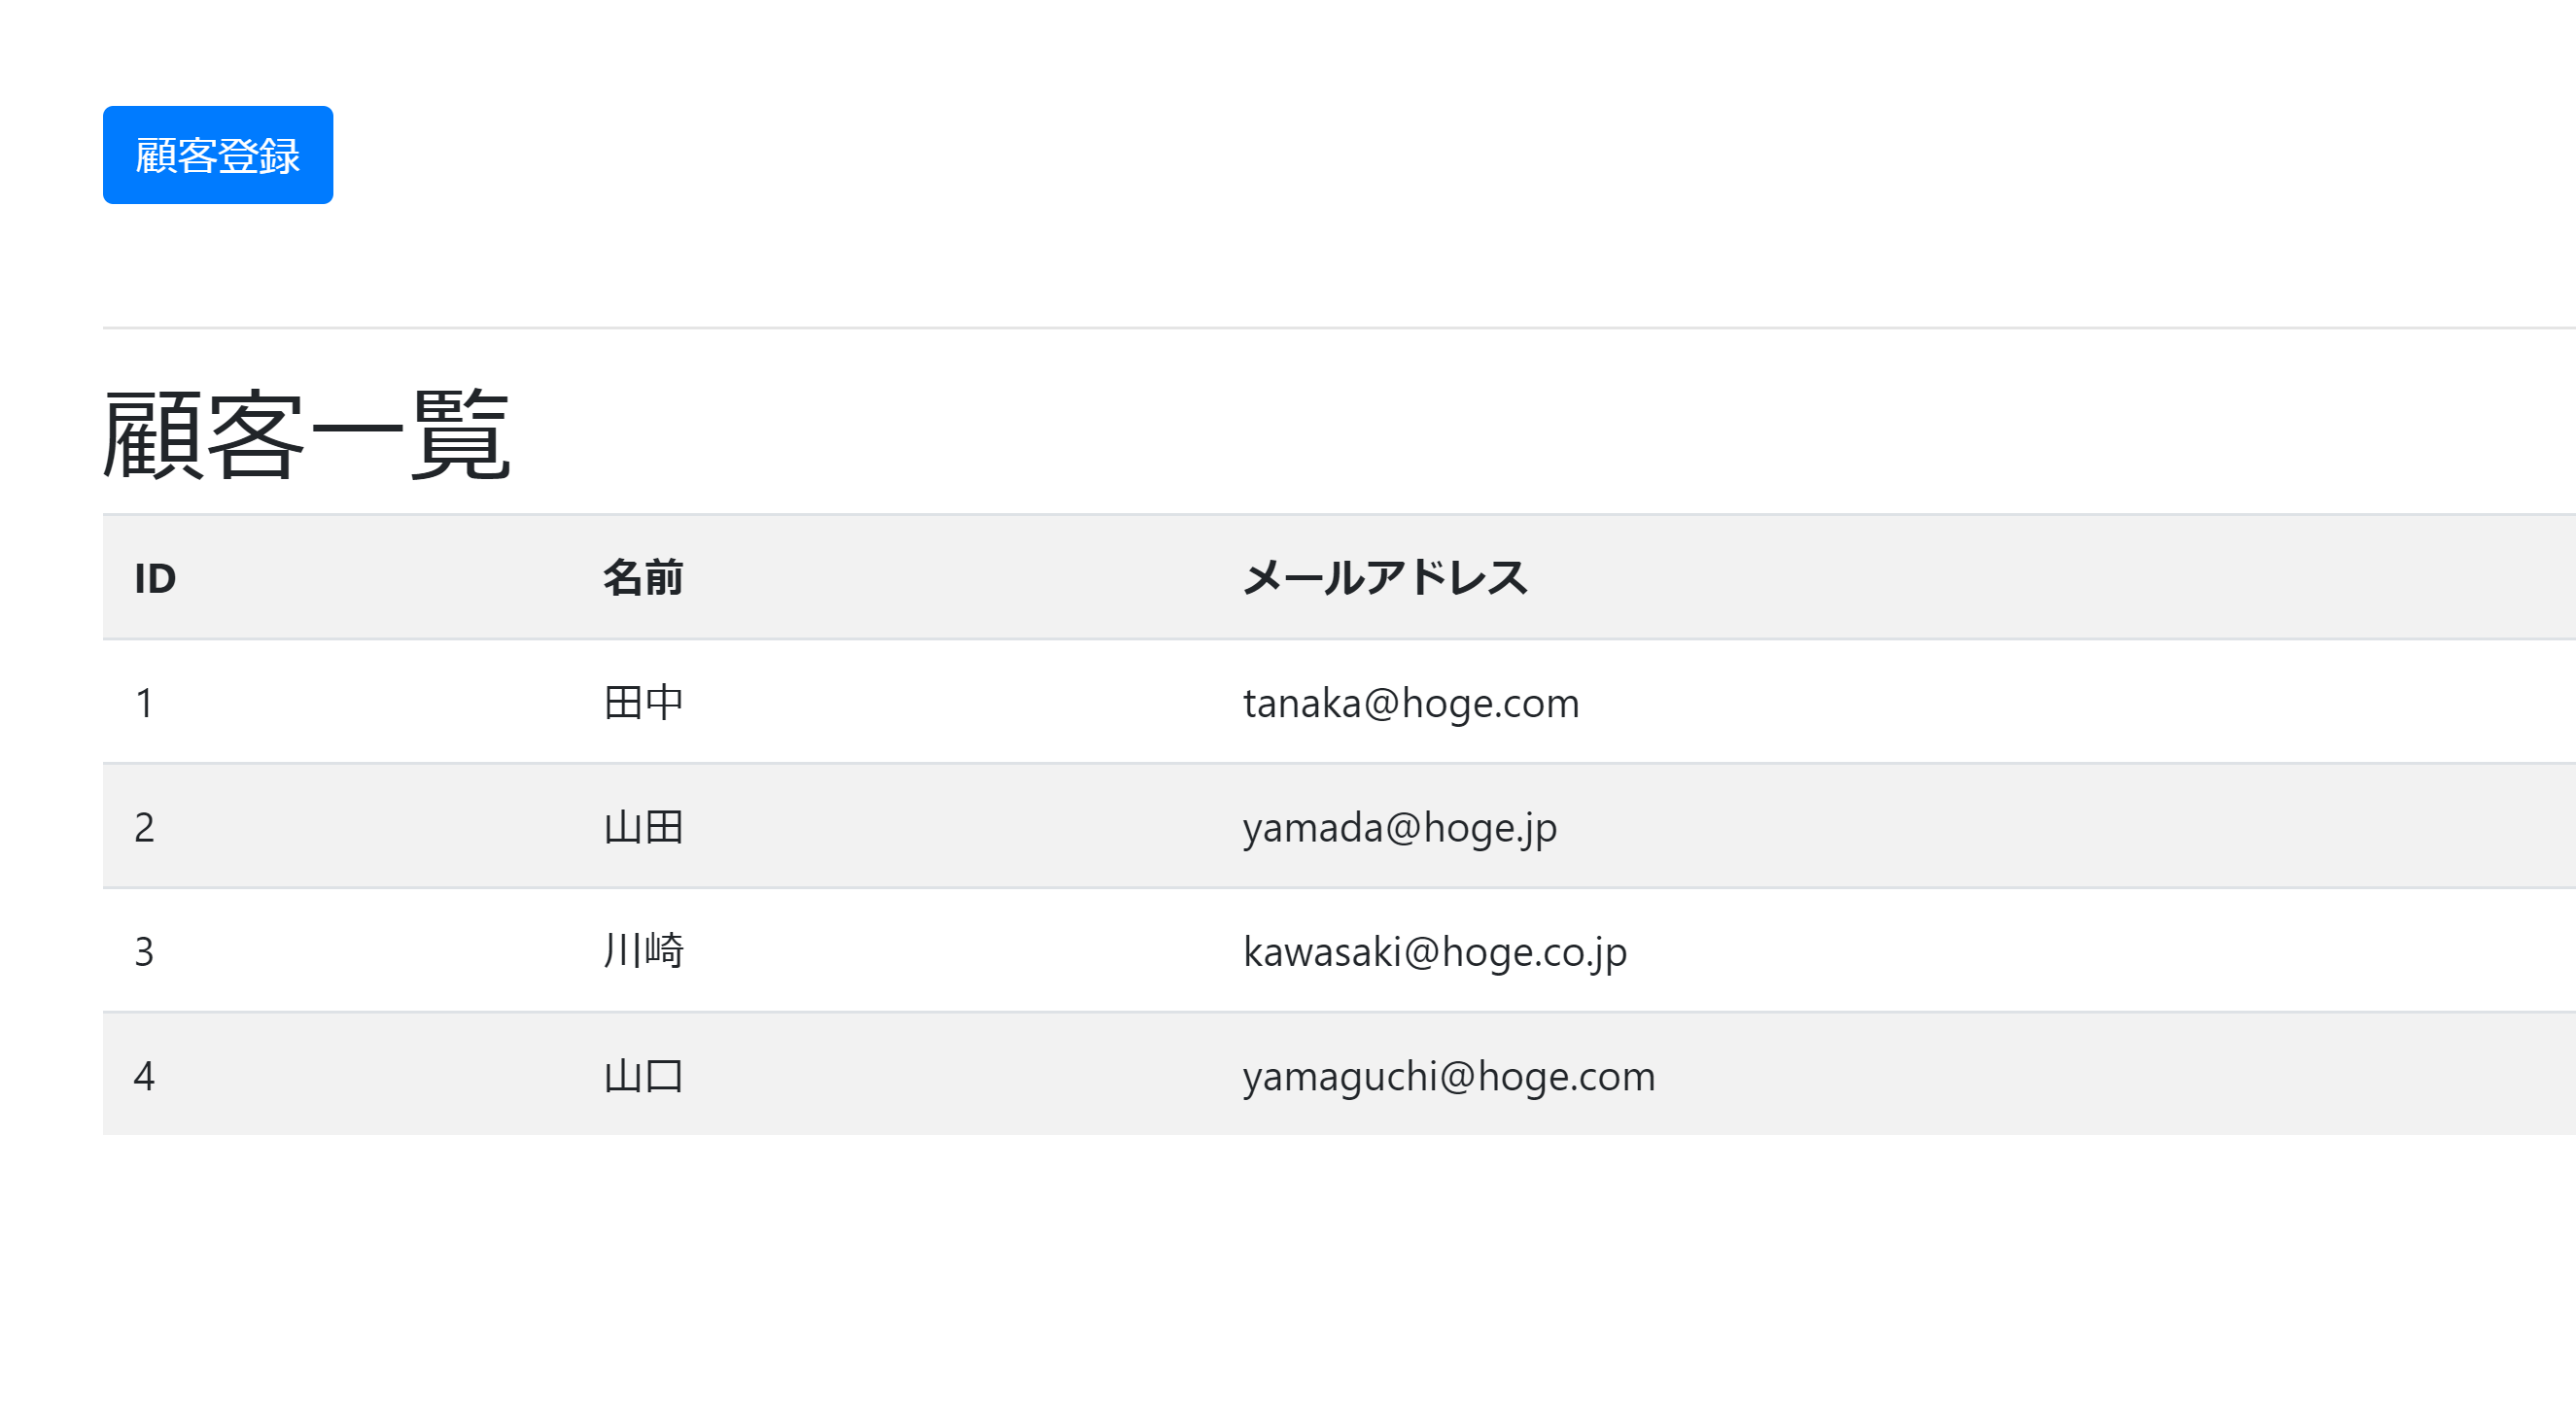
②顧客一覧画面(list.html)のスタイル整形
追記コード(Bootstrap):
<link rel="stylesheet" th:href="@{/webjars/bootstrap/4.3.1/css/bootstrap.min.css}">
<script th:src="@{/webjars/jquery/3.4.1/jquery.min.js}"></script>
<script th:src="@{/webjars/bootstrap/4.3.1/js/bootstrap.min.js}"></script>
list.html:
<!DOCTYPE html>
<html xmlns:th="https://www.thymeleaf.org">
<head>
<meta charset="UTF-8">
<!-- Bootstrapの設定 -->
<link rel="stylesheet" th:href="@{/webjars/bootstrap/4.3.1/css/bootstrap.min.css}">
<title>顧客一覧</title>
</head>
<body>
    <div class="container">
        <!-- マージンを上下に設定 -->
        <div class="my-5">
        <!-- 青色ボタンを設定 -->
        <a class="btn btn-primary" th:href="@{/create}">顧客登録</a>
        </div>
        <hr>
        <h1 class="my-2">顧客一覧</h1>
        <table class="table table-borderd table-striped">
            <tr>
                <th>ID</th>
                <th>名前</th>
                <th>メールアドレス</th>
            </tr>
            <tr th:each="customer : ${customers}">
                <td th:text="${customer.id}"></td>
                <td th:text="${customer.name}"></td>
                <td th:text="${customer.email}"></td>
            </tr>
        </table>
    </div>
    <!-- Bootstrapの設定 -->
    <script th:src="@{/webjars/jquery/3.4.1/jquery.min.js}"></script>
    <!-- Bootstrapの設定 -->
    <script th:src="@{/webjars/bootstrap/4.3.1/js/bootstrap.min.js}"></script>
</body>
</html>
スタイル整形後の画面:
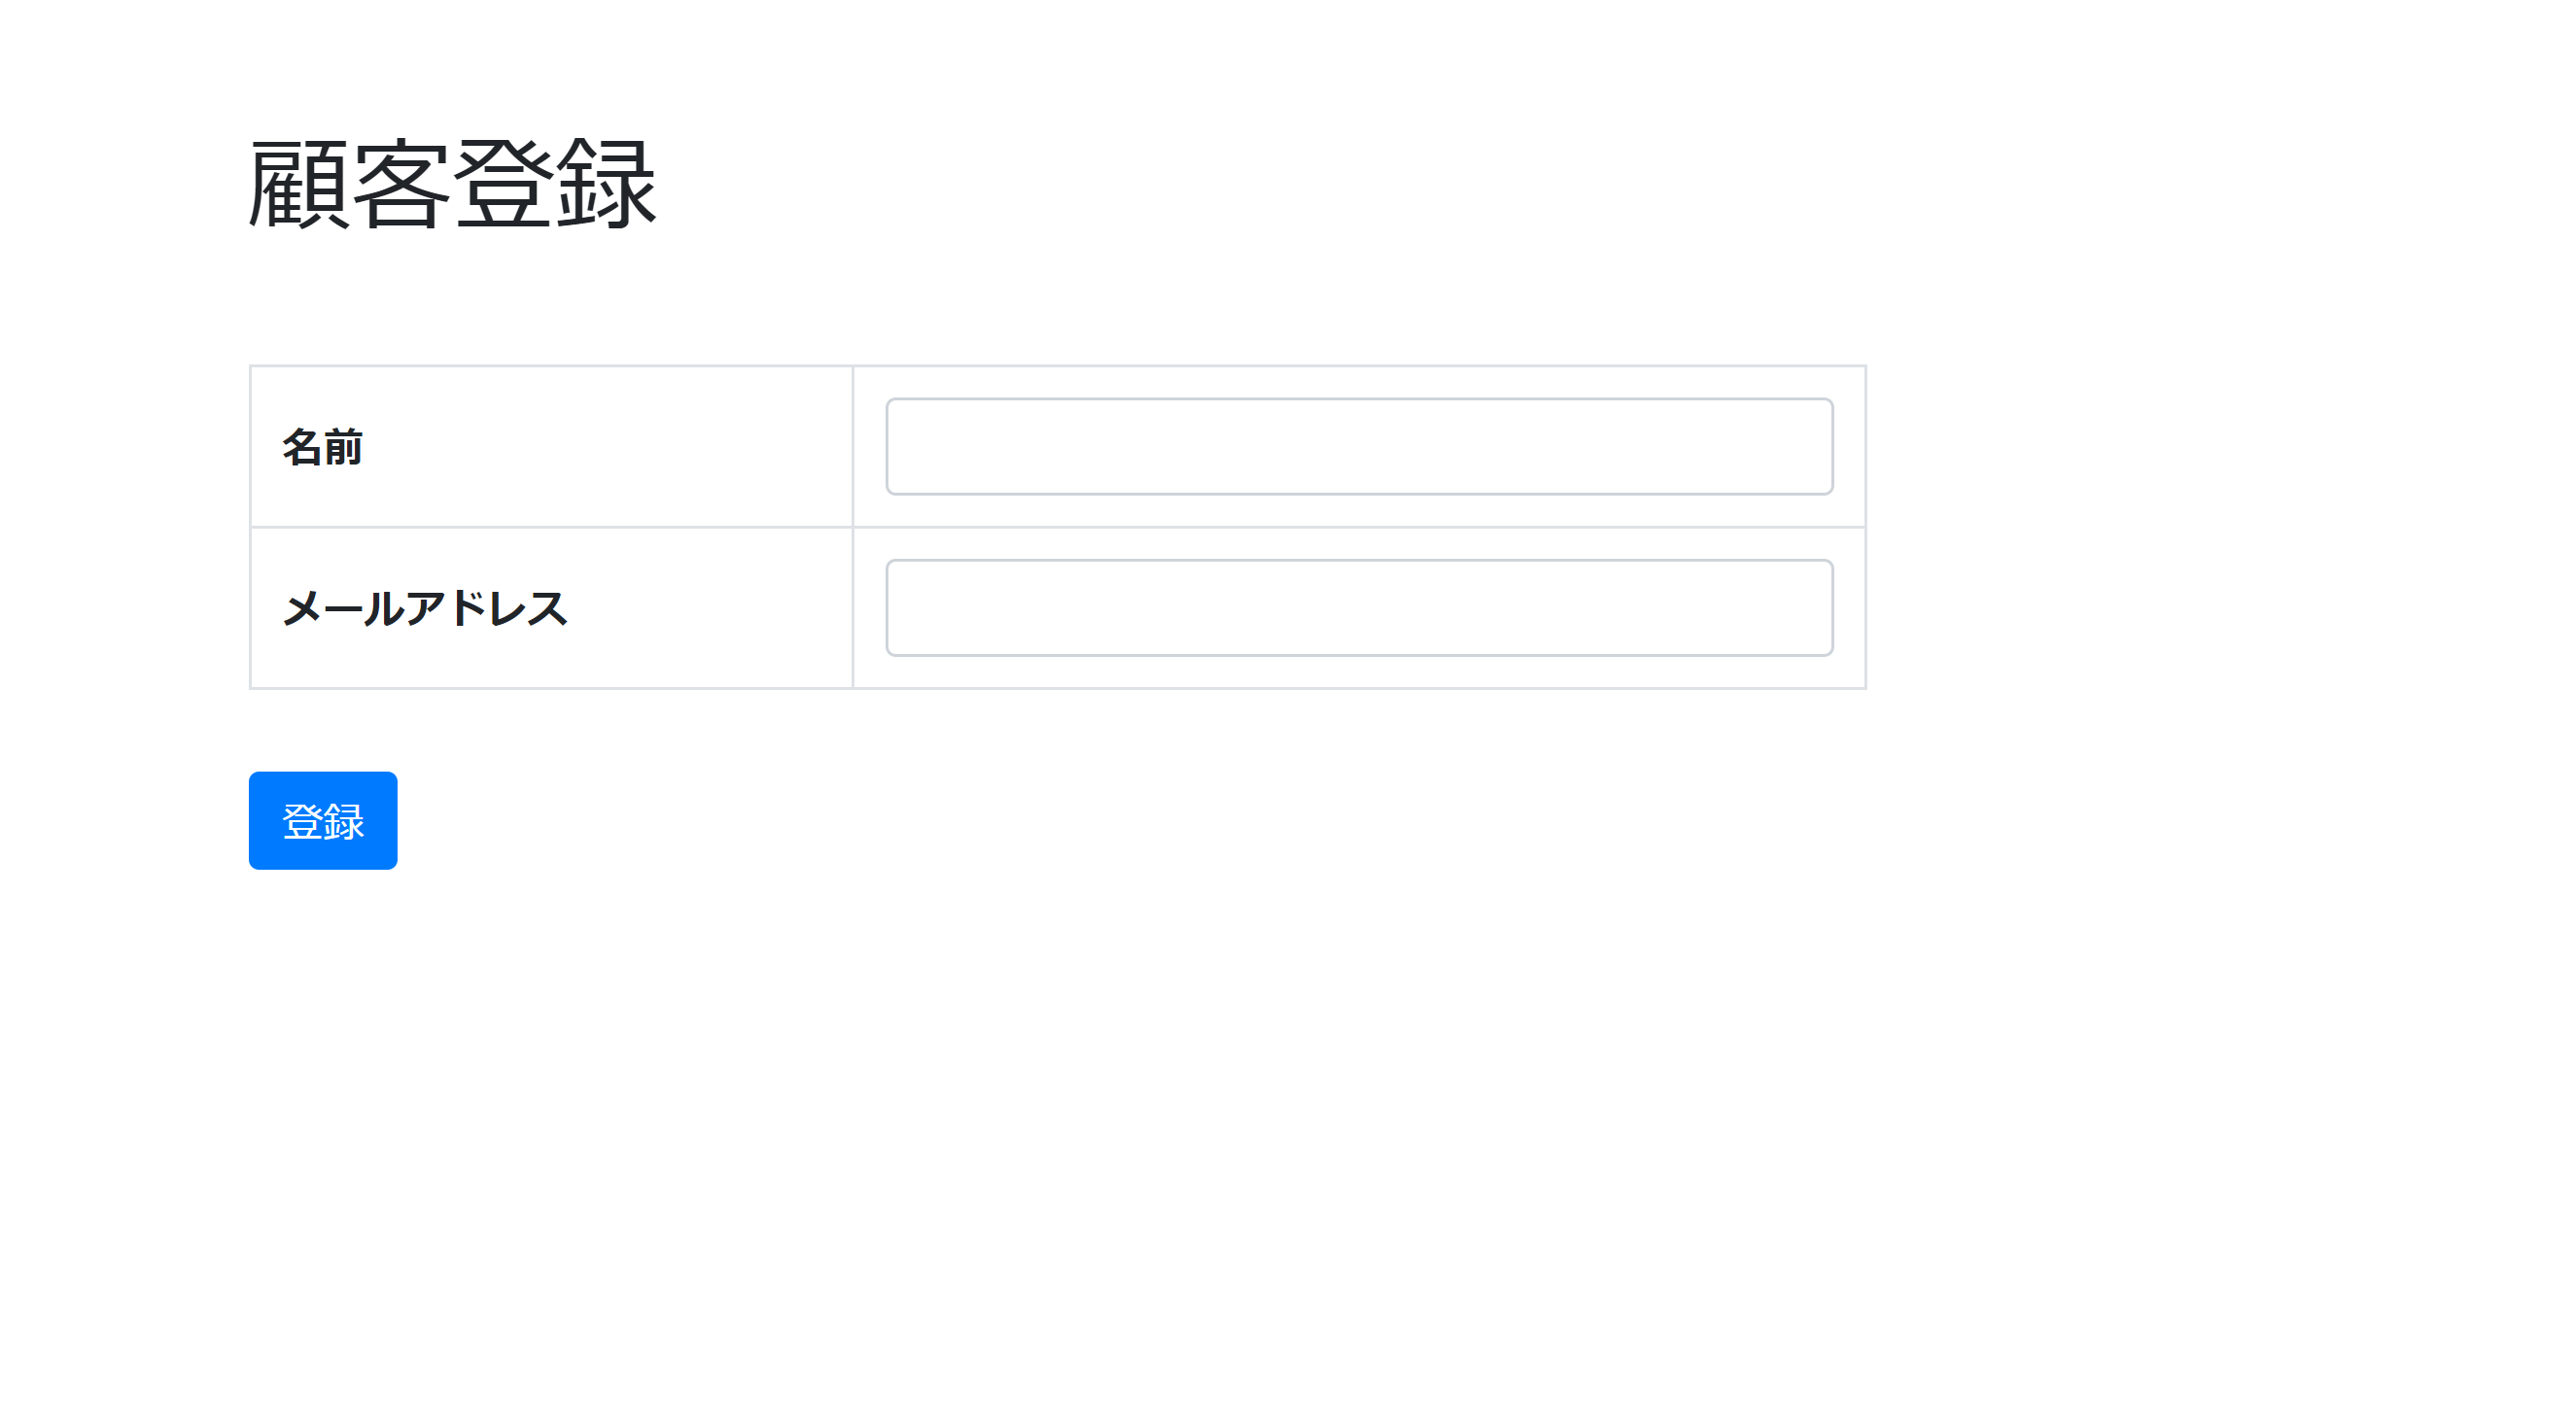
③顧客登録画面(create.html)のスタイル整形
②と同様にBootstrapで整形する
create.html:
<!DOCTYPE html>
<html xmlns:th="https://www.thymeleaf.org">
<head>
<meta charset="UTF-8">
<link rel="stylesheet" th:href="@{/webjars/bootstrap/4.3.1/css/bootstrap.min.css}">
<title>顧客登録</title>
</head>
<body>
    <div class="container">
        <h1 class="my-5">顧客登録</h1>
        <form th:action="@{/create}" th:object="${customerForm}" method="post">
            <!-- マウスホバー テーブル幅を画面の50%に設定  -->
            <table class="table table-bordered table-hover col-6">
                <!-- フォームの部品はform-groupで囲う -->
                <tr class="form-group">
                    <!-- テキストを縦中央揃え -->
                    <th class="align-middle">名前</th>
                    <!-- テキストボックスにform-controlで整形 text-dangerでエラー文字を赤色に設定 -->
                    <td><input type="text" class="form-control" name="name" th:field="*{name}"><span class="text-danger" th:if="${#fields.hasErrors('name')}" th:errors="*{name}"></span></td>
                </tr>
                <tr class="form-group">
                    <th class="align-middle">メールアドレス</th>
                    <td><input type="text" class="form-control" name="email" th:field="*{email}"><span class="text-danger" th:if="${#fields.hasErrors('email')}" th:errors="*{email}"></span></td>
                </tr>
            </table>
            <input type="submit" class="btn btn-primary mt-3" value="登録">
        </form>
    </div>
    <script src="webjars/jquery/3.4.1/jquery.min.js"></script>
    <script src="webjars/bootstrap/4.3.1/js/bootstrap.min.js"></script>
</body>
</html>
スタイル整形後の画面:
Bootstrapの詳細は公式リファレンスで確認
Bootstrap公式リファレンス
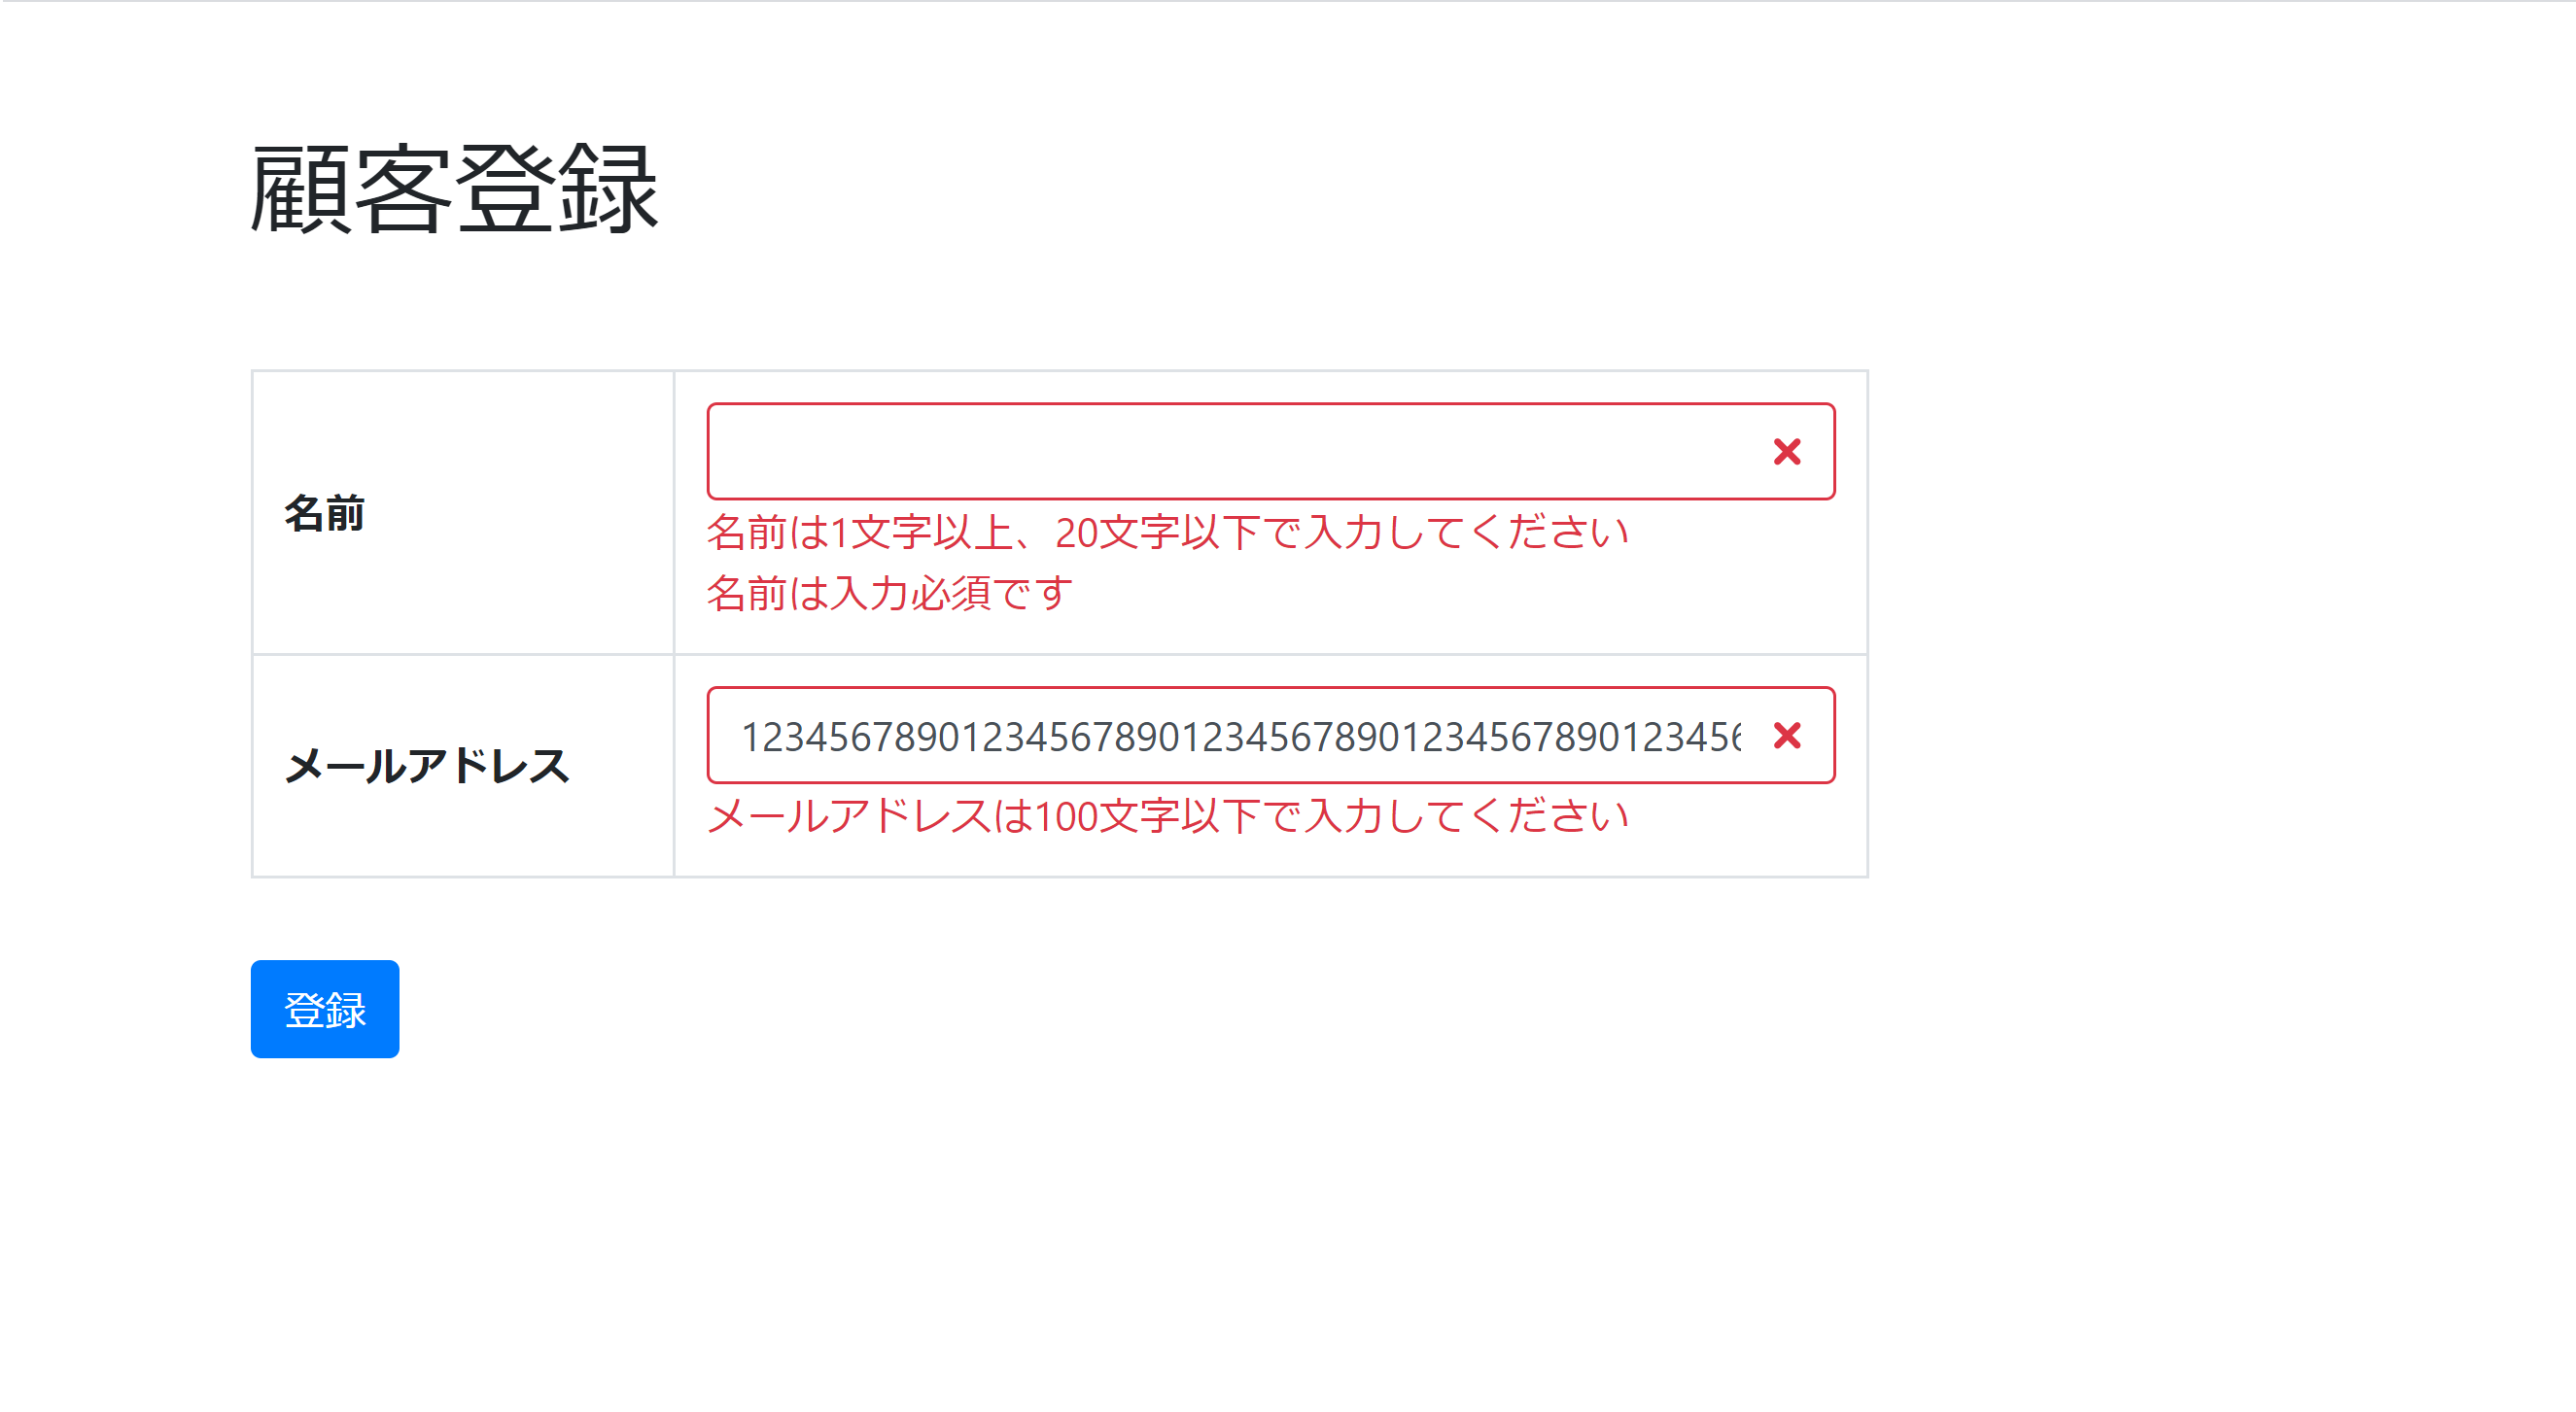
④バリデーションチェックエラー時のみクラスを追加
顧客登録画面(create.html)
            .
            .
            .
<body>
    <div class="container">
        <h1 class="my-5">顧客登録</h1>
        <form th:action="@{/create}" th:object="${customerForm}" method="post">
            <table class="table table-bordered table-hover col-6">
                <tr class="form-group">
                    <th class="align-middle">名前</th>
                    <!-- ポイント1 -->
                    <td><input type="text" class="form-control" name="name" th:field="*{name}" th:classappend="${#fields.hasErrors('name')} ? 'is-invalid'"><span class="text-danger" th:if="${#fields.hasErrors('name')}" th:errors="*{name}"></span></td>
                </tr>
            .
            .
            .
【ポイント】
1.th:classappend="${#fields.hasErrors(‘フィールド名’)} ? ‘クラス名’"
対象フィールドがエラーの場合に指定したクラスを付与する
is-invalidクラスはテキストボックスを赤色にするBootstrapのクラス
※has-errorクラスはBootstrap4では廃止されているので注意すること
【エラーメッセージを確認】
顧客登録画面で下記内容を入力して登録ボタンを押下
・名前:空欄
・メールアドレス:101文字以上
⑤自作のCSSファイル(styles.css)を作成する場合
格納先:src/main/resources/static/css
※static/cssフォルダが無い場合は作成すること
顧客一覧画面(list.html)と顧客登録画面(create.html)にCSSファイルのリンクを記述
<!-- ポイント1 -->
<link rel="stylesheet" th:href="@{/css/styles.css}" href="../static/css/styles.css">
【ポイント】
1.ブラウザ用とEclipse用の2種類のリンクを記述
・ブラウザ用:アプリケーションを起動してThymeleafで確認する場合
⇒th:href="@{/css/styles.css}"
・Eclipse用:EclipseのWebブラウザ用
⇒href="../static/css/styles.css"
※開発用なので特にEclipseのWebブラウザで確認しない場合は記述不要